


While I love the metal IKEA frame (especially spray painting it!), I've often wanted a wood frame option for our oversized Juniper prints without the price of going to a custom frame shop (though, as another option, we recently ordered this 31x47" natural wood frame for about $120 and it was great!).
But for this project, I was excited to make a DIY wood frame option for the 31x47" HILLSIDE print we hung in our new office entry! It turned out to be a pretty simple and affordable project, coming in at about $30 total.
Here's what you'll need to make this exact frame:
- 8' lengths of 1.5x.75" pine trim (you'll need 2-4 lengths depending on what size frame you're making - see below)
- Miter saw (power or hand + blade guide)
- Carpenter's square
- 3" metal L-shapes corner plates (Qty. 4)
- Wood glue and wood filler
- Craft paint (Colors: FolkArt Linen, Brown and Black) and a brush - anything will do!
- Sawtooth hangers
- Juniper print in 22x55, 31x47, 40x55, 55x79
- 1" Painter's Masking tape
- (Optional) Rubber bumper pads
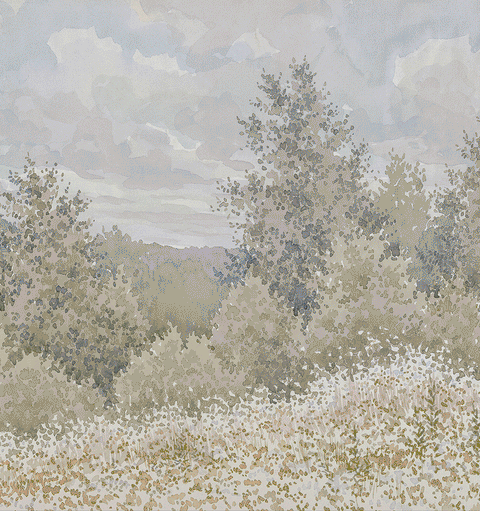
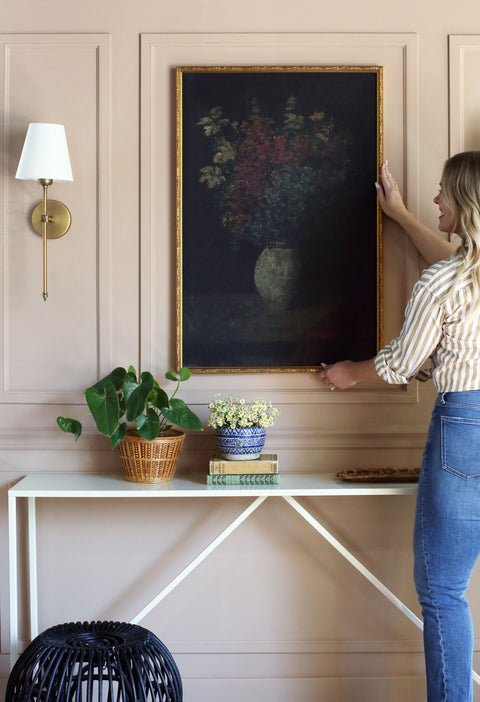
To start, select your Juniper print. I chose HILLSIDE by Hannah Winters in the 31x47 size for above our office entry sofa. At almost four feet wide, the print makes a big statement while not overwhelming this smaller space. I especially love the soft blue and green colors of this print against the wall color (Farrow & Ball Studio Green).

Meadow Flowers I Print with Black Frame (similar)
Meadow Flowers II Print with Wood Frame // Swimmers Print with 8x10 Gold Frame (similar)
Cream Sofa(similar) // Jute Rugs // Vintage Oushak (similar) // Table Lamp (similar) // Cream & Rust Pillow(similar) // Striped Kilim Pillow (similar) Ottoman (similar)
Click here to see how we made this fluted table!
It's a good idea to choose wood for your frame material that's at least 1.25" wide, since the oversized prints are so large. You don't want there to be any sagging or bending with the long stretches of frame, which could happen when using thinner material without more substantial corner supports. I chose simple 1.5x.75"x8' select pine trim from Home Depot. Take your time when choosing your lengths and try to find pieces that are as straight as possible!


Here's a little cheat sheet that will help you figure out how many 8' lengths you'll need and measurements for the outside miter cut measurements that correspond to each of our print sizes. This chart was made assuming you're also using at least 1.5" wide trim!

Measure and mark your cuts based on the reference chart above. Since these are miter cuts (made at a 45 degree angle), the measurement is for the longest side, which will be for the outside corners of your frame. Basically, just make sure you're marking the top of the board and angle your saw in for the cut. You can use a power saw or you can easily make the cuts by hand using this affordable blade and guide.

Once all four lengths have been cut, use a Carpenter's Square to perfectly line up a corner. Please a 3" metal corner brace in the outside corner of the frame as shown below (maybe an 1/8" inside the outer corner). Use a pencil to mark the holes for your screws, drill small pilot holes and then drill in the screws. Repeat on all corners. Note: the seam of your corners likely won't be perfectly flush, but get it as tight as possible.

Carpenter's Square // Miter Box // Corner Braces


Flip your frame over and fill the corner seam with wood glue to help add stability to the corners. Let the glue in all the corners dry completely for several hours and then fill any remaining gaps with wood filler.

Carpenter's Square // Wood Filler // Wood Glue

Next, tap in two sawtooth hangers in the upper left and right hand corners of the frame, in line with the corner brace, as shown below. The print goes underneath the corner brace and the sawtooth hanger, so be sure to keep these on the upper half of the frame. The finished framed print ends up only weighing a few pounds, so a thin nail in your wall used with each sawtooth hanger is plenty! It's optional, but I also like to add these clear rubber bumper pads to further help the frame sit flush and stay put where you want it to be on your wall.

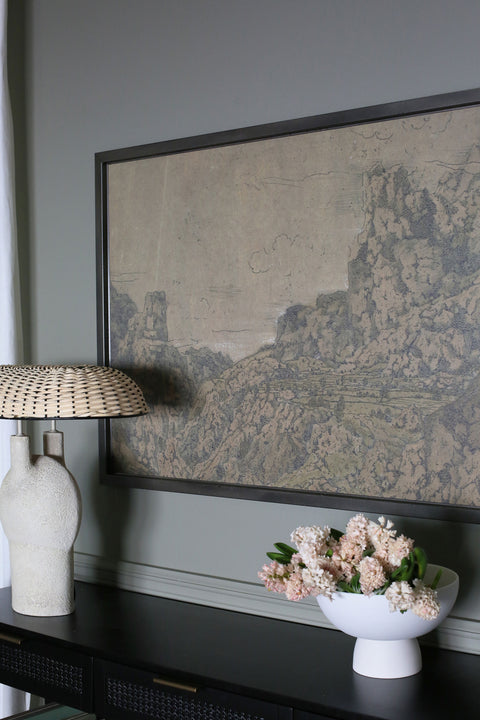
As a final step, you can paint or stain the wood to compliment your print and space. I prefer using watered down acrylic craft paint for "staining" raw wood. I usually use FolkArt in Linen, Brown and Black to mix different colors. I ended up choosing a blonde shade for this space and the HILLSIDE print. It's mostly the linen color with just a drop of black and brown.

I liked the third stain down from the top the best. I liked that is was light but not as stark as the pure white spray painted IKEA frame on the right. The warmer, softer color looked best against the dark walls here.

I usually mix about one part paint to four parts water for making an acrylic paint wash or stain. I like the grain of the wood to still show through. I probably should have watered down the paint here more - I wish it were even more translucent!

You can seal the paint stain if you want, but I don't bother sealing frames because they aren't usually touched. Once the paint is completely dry, you can flip the frame over to install the print. To do this, I used 1" painters tape and tore off smaller strips, lined up the face-down and centered print on the back of the frame and carefully taped 4-5 strips down one long side. Then I repeated the process on the other long side, while sort of pulling the print taut before placing each strip of tape. You can pull the tape up and adjust as needed. Repeat these steps for the short sides of the frame. The tighter and more flat the print can be against the frame, the better the result.

The small strips of tape are doing the most work for securing the print to the frame, but to keep everything in place and laying flat, I like to run one long strip of the same 1" masking tape on top of the smaller strips on each side.

And that's it! This a screen grab of a video I filmed for my stories, so the quality is not great in this image, but I love how it all came together!

And here is the print hanging in our new office entry! I love the light frame on the dark, moody walls. I especially love how it mixes with the other frames we hung in the space. You can see all the sources for this room reveal listed at the bottom of the post, but we share a lot of the details in previous blog posts including a DIY project for the fluted table and a tutorial on making faux trees look more real!

Cream Sofa (similar) // Rust Chair (similar) // Jute Rugs // Vintage Oushak (similar)
Table Lamp (similar) // Blue Pillow(similar) // Cream & Rust Pillow(similar)
Striped Kilim Pillow (similar) // Ottoman (similar)


Cream Sofa(similar) // Plaid Wool Blanket (similar) // Floor Lamp

I hope this was a helpful post and that this project doesn't feel too intimidating! I wanted to include a lot of steps and photos, so it might look like a harder project here than it really is. :) As always, let us know in a comment or DM if you have any questions! We're so happy to help!
JUNIPER OFFICES ENTRY SOURCES:
Wall color: Farrow and Ball Studio Green
Prints: HILLSIDE / MEADOW FLOWERS I and II / SWIMMERS / GARDEN ROSES / MOTHS II / FLIGHT / KNOTS II
Flooring: Lifeproof in Dusk Cherry
Smaller Frames for Gallery Wall